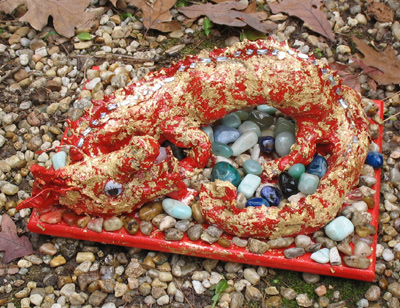
Japanese Dragon Time
This weekend, I sheparded my ten-year-old son through part of a school project. As the 3-d portion of the display, he wanted to make a Japanese dragon.
Not easy!
First, we had to talk about the materials. He didn’t like the idea of paper maché or plaster of paris. He wanted real clay, and not play clay either but the real deal.
I’m very thankful that there was a Michaels Arts and Crafts store nearby. It was raining and cold, and the store was crowded. We ran into two other 5th-graders, so he’s not the only one running up against the deadline! We got the red backboard display, and some shiney lettering, red felt, gray clay – with tools, red spray paint, gold leaf flakes, ruby-red glitterglue, “jewel” stickers, all kinds of supplies. We also picked up a balsa-wood model of the dragon, to be a base over which he could model the clay. I was thinking that the thicker the clay layers were, the longer it would take to dry. Unfortunately, the “puzzle” aspect was indiscipherable, and eventually both of us gave up on it.
So – freeform it is!
The first attempt was too small, and was gettisoned.
The second attempt was great, but as the clay started to shrink, parts of it – including the whole spinal fin – snapped off.
Art is sometimes a matter of figuring out things as you go along.
Ben patched the dragon, and used the opportunity to add some twirly twigs and pipe-cleaner claws.

We waited as long as we could for stage two to dry, then we went outside. It was very cold, and windy. Spraying the clay with red paint was very easy. While it was wet, Ben wanted to try to get the gold leaf flakes into it. Most of the flakes blew away (although I still have a fair bit in my hair – tenacious stuff!). I thought it looked good just painted red, but he really wanted there to be gold in it. We watered down some Elmer’s glue and smoothed the flakes as much as we could with a toothbrush.
By now, the base was covered with drying glue, and the flakes were more like chunks. Ben wanted to give up – it didn’t look the way he had pictured it!

Continue! Onwards and upwards!
He slopped on more glue over the paint and flakes, and it started to look better. We took a break.
I suggested lots of ideas. “Would you like to use the ruby glitter-glue along the spine?” No.
“Would you like to use a Sharpie to draw scales or texture?” No.
“Would you like to cut out other materials – feathers, paper, anything – to add something to the head and tail?” No.
Finally, he said that the dragon should be set off from the base. We had some vinyl, and some scrapbooking paper, and even aluminum foil. None of these seemed to look right to him.
“I think it needs pebbles because it’s a symbol for a sea god,” he decided.
We went outside. There are a whole bunch of little pebbles. Then he asked me for some of *my* pebbles – tumbled aventurine and other things that I like to collect. Sigh. Ok. I showed him how to spray adhesive to the base, and Ben spent an hour picking his favorite bits of rock from outside and from my collection.
He’s getting good with the painting! This was the easiest part – spray the whole thing with clear shellac. That helped the pebbles stay put and added a nice gloss to the whole thing. Now the gold flakes won’t be falling off like leprosy either. Good!
The last touch? “Jewel” stickers along the edge of the spiny scales. A little bit of sparkle.
All done. He loves it. Yay.

Backboard, first steps… and done for the day. No writing on the novel today… but… it was fun working on some art with my boy. He’s a great artist.

Now, does anyone know how to get gold leaf flakes out of your hair? A shower didn’t do it (grin).
2 thoughts on “Japanese Dragon Time”
The dragon looks absolutely lovely! Congratulations to your so, and to you of course! My girl also need to do a similar project, so I hope you don’t mind if we steal some of your ideas :)?! I especially like the fact that you put those rocks there, very nice touch!
And about the gold leaf flakes in your hair, have you tried leaving the conditioner in your hair for a longer period of time (or a hair mask)?
The gold did finally get out of my hair. I think it was more a matter of the spray adhesive (grin). Best wishes on your project. Ben says you can steal any ideas, but please send a photo to us when it’s done!